-40%
SENSOR ACTUATOR Fits ROLAND FD-8, TD-1 11 15 17 Hi Hat Pedal Rubber Part
$ 10.02
- Description
- Size Guide
Description
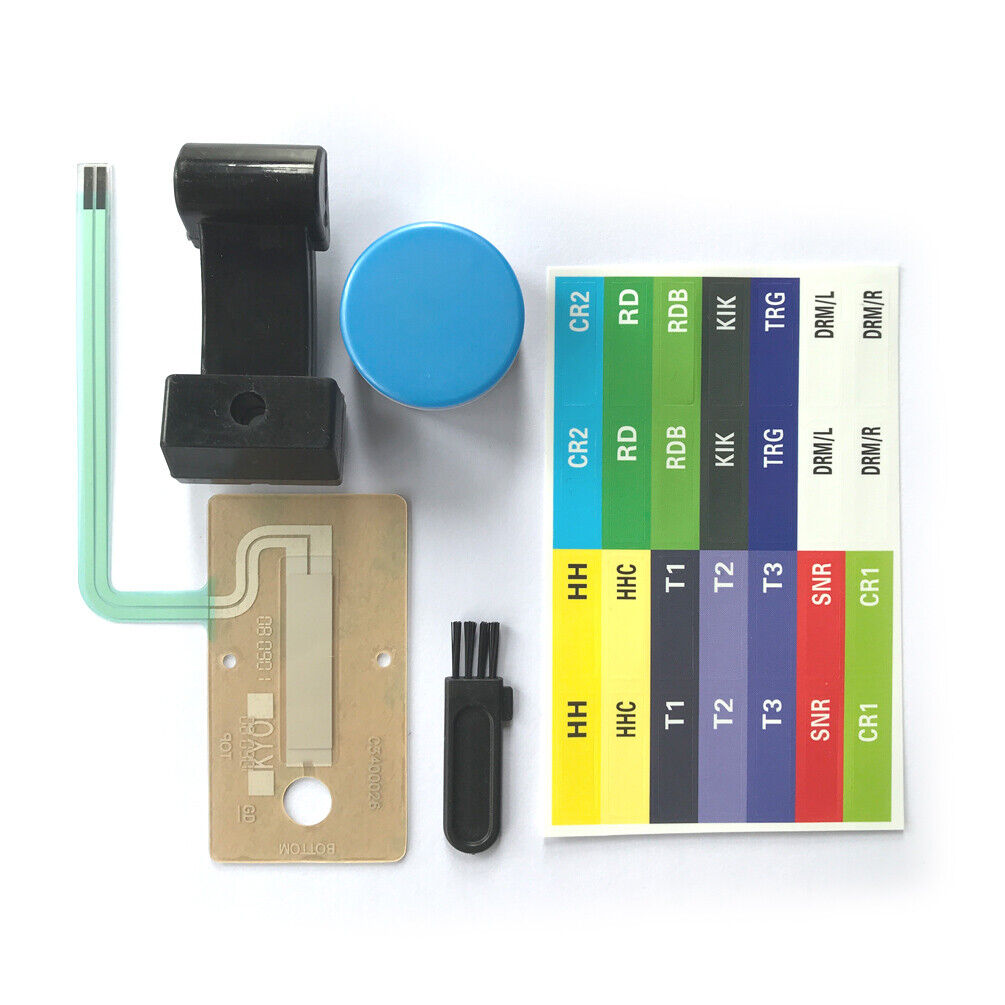
Name: Hi Hat Pedal SENSOR and Rubber partPackage:1 rubber ,1 Sensor ,5g silicone grease,one brush. Free label sticker!
Suit for ROLAND
TD series drum with FD-8 pedal.
Warranty: 3 years
Features: better elasticity, silicone parts are made of imported silica gel, the sensor switch is advanced precision electronic components, longer life and more sensitive.
Replacement tool: screwdriver
Reason for purchase:
Time-lapse silicone parts and sensor switches are aging, resulting in discordant sounds when playing, and new parts need to be replaced.
Precautions:
Hold the pedal and the bottom plate with one hand first, and then use a screwdriver to unscrew all the fixing screws at the bottom and slowly release them. Because there is a line inside, the wire may be broken. But as long as you let go slowly, it will be fine, because the maintenance allowance has been considered in the engineering design.
A: Change silicone parts:
The easiest way to do this is to pull out the silicone pieces that are hard and elastic, and then push the new silicone parts in place. No difficulty!
Then apply a special silicone grease.
Remember not to apply other types of lubricating fluid or cream. Rather, scrape the old paste on the original pedal and continue to use it. Do not apply non-corresponding grease. It will cause the plastic parts of the silicone parts to swell and affect the function, which is not worth the candle.
The application position is the highest point of the silicone head upward convex, the lower surface of the pedal metal piece in contact with the silicone head and the white plastic guide wheel.
The lubricating paste is about 5 grams, which is manually packed and extruded in a 15 ml plastic can. The appearance is not beautiful, please don't mind.
Give a small brush for easy brushing.
In fact, it is the place where there is a paste, and continue to apply the cream. Brushing position, there is a picture.
Change it, please reload it. If the problem is solved, you don't need to change the sensor. It's a little complicated, keep it.
B: Change the sensor:
First, the old sensor needs to be peeled off from the bottom plate, and the general 3M glue is still there. Direct coverage is available, no need to remove glue, because the glue removal project is huge, and the actual test will have more layers of primer without affecting the trigger.
The three positioning holes should be aligned, and the bottom of the sensor is 3M double-sided tape. Under the un-teared surface, the position of the installation is roughly simulated. Otherwise, rushing to the operation leads to sticking in an undesired position, affecting the trigger.
The sensor plug is divided into front and back. How to install it Please refer to the original installation method of the old piece. The picture is not easy to describe, and you can see it at a glance. It is recommended to remove the signal output device (that is, the component with the 6.35 mm jack), insert the sensor plug and then reinstall it. Otherwise, the space is small and the plug is not easy to plug.
Reloading:
Align the two positioning holes of the plastic part with the metal base plate, and then screw up.
debugging:
Insert the 6.35mm HHC plug-in cable, which is generally successful once and is not difficult.
Tip: Take a photo with one step and it's easy to recover.
